

Effective Methods for How to Remove Stain From Quartzite Surfaces
GMS Kumar
It's a bummer when you notice a stain on your beautiful quartzite countertops. These natural stones look amazing, but they can sometimes pick up spills, leaving you wondering how to remove stain from quartzite. Don't worry, though. Most stains aren't permanent, and with the right approach, you can get your surfaces looking like new again. We'll walk you through some simple methods and tips to tackle those unsightly marks.
Key Takeaways
- Quartzite can be porous, so sealing it is important to prevent stains from setting in.
- For fresh spills, blotting immediately with a mild soap and water solution is usually enough.
- Stubborn stains can often be removed using a DIY poultice made from baking soda and water, or other specific ingredients depending on the stain type.
- Always apply a poultice and let it dry completely to draw the stain out of the stone.
- Regular sealing and careful cleaning habits are the best way to keep your quartzite looking great long-term.
Understanding Quartzite Stains
So, you've got these beautiful quartzite countertops, right? They look amazing, super tough, and all that. But here's the thing: even though they're strong, they can still get stained. It's kind of like how a really tough person can still get a cold. Quartzite is a natural stone, and like most natural stones, it has tiny little pores. These pores are like little sponges, and they're the main reason why stains can happen.
How Quartzite Becomes Porous
Think about how quartzite is formed. It starts as sandstone, which is basically a bunch of sand grains stuck together. Then, deep underground, it gets squeezed and heated something fierce. This process fuses the sand into a really hard rock. But, even after all that, the stone can still keep some of the original texture and tiny gaps from the sandstone. These little openings are what we call pores. The more pores there are, the more likely liquids are to soak in. It's not like marble, which is way softer and definitely stains easily, but quartzite isn't completely non-porous either. Some slabs are more porous than others, depending on how they were formed.
The Mechanism of Quartzite Staining
When something spills on your counter – maybe some red wine, coffee, or even cooking oil – those liquids can seep into those tiny pores. Once the liquid is inside, it can start to break down the minerals in the stone or just sit there and discolor it. Oil-based stains are particularly sneaky because they can leave a dark, shadowy mark that looks like the stone is permanently wet. Organic stains, like from food or drinks, often leave a brownish or pinkish tint. The longer a spill sits, the deeper it can penetrate, making it harder to remove later on. This is why quick cleanups are so important.
Why Sealing is Crucial for Prevention
This is where sealing comes in. Sealing quartzite is like putting a protective shield over those pores. It doesn't make the stone completely waterproof, but it significantly slows down how fast liquids can get in. A good quality sealer penetrates the stone and fills those tiny gaps. Without a sealer, your countertops are much more vulnerable. You might notice dark spots appearing around areas where water sits, or the surface might just start looking duller over time. Resealing is something you'll need to do periodically, usually once or twice a year, depending on how much you use your kitchen and what kind of sealer you used. A simple water test can tell you if it's time to reseal: if water beads up, you're good; if it soaks in and darkens the stone, it's time for a refresh. Sealing quartzite is really your first line of defense against stains.
General Cleaning Methods for Fresh Stains
When a spill happens on your quartzite, don't panic! The key is to act fast. For most fresh spills, a simple approach is usually all you need. The quicker you address a spill, the less likely it is to become a stubborn stain.
Daily Wiping with Mild Soap
For everyday messes and to keep your quartzite looking its best, a gentle cleaning routine is your best bet. You don't need fancy chemicals for this. A little bit of mild dish soap mixed with warm water works wonders. Grab a soft microfiber cloth, dip it in the soapy water, and wring out the excess so it's just damp. Then, just wipe down the surface. This is great for general upkeep and removing light grime.
- Mix a small amount of mild dish soap with warm water.
- Use a damp microfiber cloth to wipe the surface.
- Rinse the cloth with clean water and wipe again to remove any soap residue.
The Blotting Technique for Spills
This is super important for any liquid spill, especially things like coffee, wine, or juice. Instead of wiping, which can spread the liquid and push it deeper into the stone, you want to blot. Take a clean cloth or even a paper towel and gently press it onto the spill. The idea is to soak up as much of the liquid as possible without smearing it around. This simple step can make a huge difference in preventing a stain from setting in. Remember, blot, don't wipe for spills.
Drying Surfaces to Prevent Water Spots
After you've cleaned up a spill or wiped down your counters, the last step is crucial: drying. Water, especially if you have hard water, can leave behind spots or a dull film. Get a clean, dry microfiber cloth and give the entire surface a good wipe-down. This removes any lingering moisture and helps maintain that beautiful shine on your quartzite. It might seem like a small thing, but it really helps keep your countertops looking pristine.
Always use a clean, dry microfiber cloth for the final drying step. This prevents water spots and ensures your quartzite maintains its natural luster without streaks.
DIY Poultice Techniques for Stubborn Stains
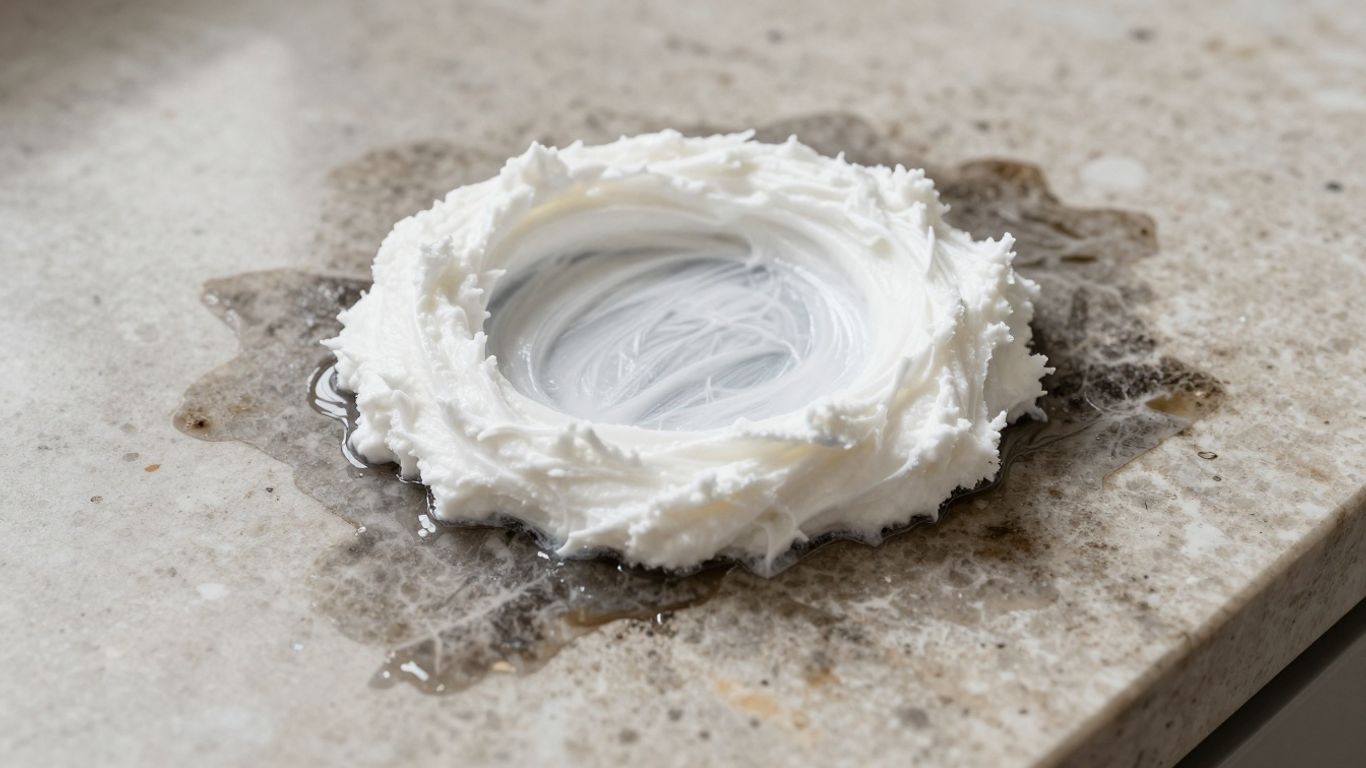
Sometimes, even with regular cleaning, a stubborn stain can appear on your beautiful quartzite. Don't panic! Before you reach for harsh chemicals, consider making your own poultice. A poultice is essentially a paste that draws stains out of porous materials like stone. It's a gentle yet effective method for tackling those tougher spots.
Creating a Baking Soda and Water Paste
This is your go-to for many common stains, especially organic ones like coffee or tea. Baking soda is a mild abrasive and a great absorbent.
- Mix: Combine baking soda with just enough warm water to form a thick paste. Think of the consistency of peanut butter – not too runny, not too dry. You want it to stick to the stain without dripping off.
- Apply: Use a spatula or a plastic scraper to spread a layer of this paste directly over the stained area. Make sure it covers the stain completely and extends a little beyond its edges.
- Cover: Once applied, cover the paste with plastic wrap. Tape down the edges to create a seal. This keeps the paste moist and allows it to work its magic over time.
Using Acetone for Oil-Based Stains
For those greasy marks, like from cooking oil or cosmetics, acetone can be a lifesaver. Acetone is a solvent that helps break down and lift oily residues.
- Mix: Combine acetone with baking soda. Again, aim for that thick, peanut butter-like consistency. Be sure to work in a well-ventilated area when using acetone.
- Apply: Spread this mixture over the oily stain, just like you would with the baking soda paste.
- Cover: Seal it with plastic wrap and tape. This method is particularly good for drawing out dark spots that look like they're still wet.
Hydrogen Peroxide and Baking Soda for Organic Stains
If you're dealing with organic stains that have left a pinkish or brownish tint, a mix of hydrogen peroxide and baking soda can be very effective. Hydrogen peroxide has mild bleaching properties that can help lift these types of discolorations.
- Mix: Create a paste using baking soda and hydrogen peroxide. You might need to adjust the amounts to get the right texture. It should be thick enough to stay put.
- Apply: Apply this paste generously over the stained area.
- Cover: Cover with plastic wrap and tape the edges. This allows the peroxide and baking soda to work together to break down the stain.
Remember, the key to a successful poultice is patience. Allowing the paste enough time to dry completely is what enables it to pull the stain out of the stone. Don't rush this step; it's where the real work happens. You can find more tips on how to remove stains from quartzite if you need them.
After applying your chosen poultice, the next step is letting it dry and then removing it. This process is detailed in the following section, but the preparation here is half the battle. Getting the right mix and application is really important for effective stain removal.
Applying a Poultice for Effective Stain Removal
So, you've got a stain that just won't budge with regular cleaning. Time to bring out the big guns: the poultice. This method is like a mini-spa treatment for your quartzite, drawing out stubborn discoloration. It might sound a bit fancy, but it's actually pretty straightforward once you get the hang of it.
Mixing the Poultice to the Right Consistency
First things first, you need to make your poultice paste. The goal here is a consistency similar to peanut butter – thick enough to stick but not so dry that it crumbles. You'll typically mix a cleaning agent with an absorbent powder. For oil-based stains, acetone is a good choice, while hydrogen peroxide works well for organic ones. Baking soda is a common absorbent powder that works for many situations. Just add your chosen liquid to the powder gradually, stirring until you get that perfect, spreadable texture. Don't make it too wet, or it won't absorb the stain properly.
Applying and Covering the Poultice
Once your paste is ready, grab a spatula or a putty knife. Spread a layer of the poultice about a quarter to half an inch thick directly over the stained area. Make sure to extend the paste a little beyond the edges of the stain itself. This helps ensure the entire affected area is covered. After applying, cover the poultice with plastic wrap. Tape down the edges securely to create a seal. You can poke a few tiny holes in the plastic wrap; this allows for very slow evaporation, which is key to the process.
Allowing Sufficient Drying Time for Extraction
This is where patience comes in. You need to let the poultice sit and do its work. The plastic wrap helps keep it moist initially, but as it slowly dries, it begins to draw the stain out of the quartzite's pores and into the paste. This drying and absorption process typically takes between 24 to 48 hours. You'll know it's ready when the poultice is completely dry and hard. This waiting period is crucial for effective stain removal.
Removing the Poultice and Rinsing
After the waiting period, it's time to remove the poultice. Gently scrape away the dried paste using a plastic scraper or a spatula. Be careful not to scratch the stone. Once the bulk of the poultice is removed, rinse the area thoroughly with clean water. Use a soft cloth to wipe away any remaining residue. Finally, dry the surface completely with a clean, dry microfiber cloth to prevent any new water spots from forming. You might need to repeat the process for really deep or old stains, but often, this method works wonders.
The poultice method relies on a simple principle: using an absorbent material to wick away discoloration from porous stone. It's a bit like a science experiment for your kitchen counter, but with a very practical outcome.
Addressing Specific Stain Types
Even with a good cleaning routine, sometimes stubborn stains just happen on quartzite. The trick is figuring out what kind of stain you're dealing with so you can pick the right method to lift it out. It’s not always a one-size-fits-all situation, you know?
Tackling Organic Stains Like Coffee and Wine
These are usually the ones that leave behind a brownish or pinkish mark. Think coffee spills, red wine splashes, or even tea rings. For these, a mix of hydrogen peroxide and baking soda works wonders. You'll want to create a paste that's thick enough to stick to the stain. Apply it, cover it up, and let it work its magic for a good 24 to 48 hours. This paste acts like a magnet, pulling the color right out of the stone.
Removing Dark Spots from Oil and Grease
Oil-based stains, like those from cooking grease, butter, or even some makeup, tend to show up as dark spots. They often look like a permanent wet patch on the surface. To tackle these, you'll want something that can break down the oil. Acetone is a good option, or you can use a specialized degreaser. Mix your chosen cleaner with baking soda to form that same thick paste we talked about. This poultice will draw the oily residue out of the quartzite's pores. Just remember to work in a well-ventilated area when using acetone.
Dealing with Hard Water Deposits
Hard water is a pain, especially if you have darker quartzite. Those mineral deposits, like calcium and magnesium, can leave behind cloudy white rings or a crusty buildup, particularly around sinks and faucets. You definitely don't want to use harsh chemicals like CLR here, as they can damage the stone. Instead, try a #0000 (super fine) steel wool pad. Gently buffing the affected area with this pad can often remove the mineral deposits without scratching the surface. It takes a little patience, but it's a safe way to get rid of those unsightly spots. For general cleaning, using a pH-neutral stone cleaner is always a good idea to prevent these issues in the first place.
Commercial Solutions for Difficult Stains
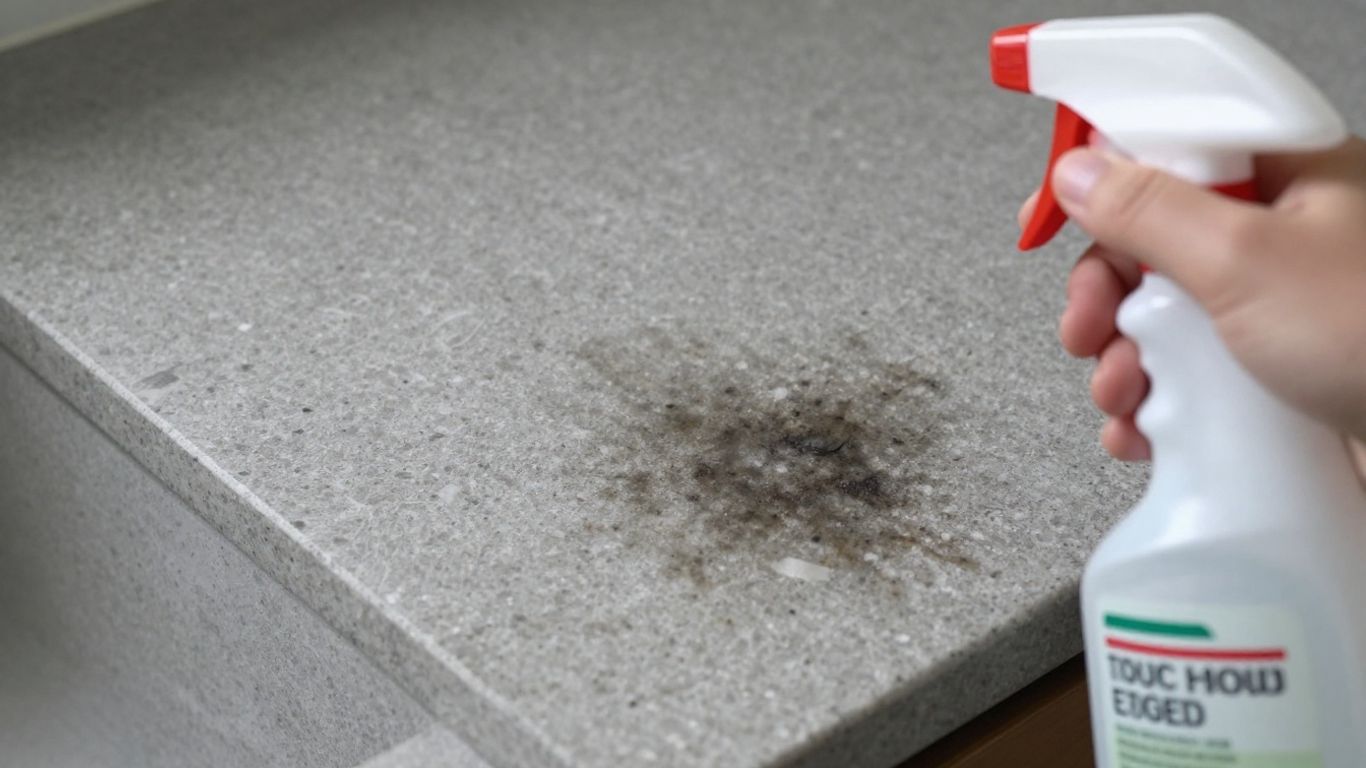
Sometimes, those stubborn stains just won't budge with home remedies. When you've tried everything and the stain is still there, it might be time to look at commercial products. These are often formulated with stronger stuff, but you've got to be careful. Using the wrong cleaner can actually make things worse, or damage the sealant on your quartzite. It's always a good idea to check with your stone supplier or installer about what they recommend for your specific type of quartzite. They might even have their own brand of stain remover that they know works well. For instance, some companies offer specialized stone cleaners that are pH-neutral, which is generally safe for natural stone surfaces. You can find these at most home improvement stores or specialty stone care shops. Always read the product label carefully and follow the instructions to the letter. Using a product designed for natural stone is key to avoiding damage.
When to Seek Professional Stain Removers
If you're hesitant about using stronger chemicals yourself, or if a stain just seems impossible to lift, don't be afraid to call in the pros. Stone fabricators often have access to professional-grade stain removers that are more potent than what you can buy off the shelf. They also have the experience to know exactly what to use and how to apply it without harming your countertops. It's like when I tried to fix my bike chain last weekend – looked easy on YouTube, but ended up a greasy mess. Sometimes, it's just better to let someone who knows what they're doing handle it. They can assess the stain and choose the best treatment. This can save you time, frustration, and potentially the cost of repairing damage from a DIY attempt gone wrong.
Recommended Commercial Stone Cleaners
When you're shopping for commercial cleaners, look for products specifically labeled for natural stone or quartzite. Many of these are pH-neutral, meaning they won't strip the sealant or etch the stone. Some popular brands offer cleaners that are great for general maintenance and can tackle light staining. For tougher jobs, you might need a dedicated stone stain remover. Always test any new cleaner in an inconspicuous spot first, just to be safe. You want something that cleans effectively without leaving behind residue or dulling the finish. A good starting point is often a pH-neutral stone cleaner, which is a safe bet for most situations [fc3c].
Using Specialized Degreasers
For oily or greasy stains, a specialized degreaser might be necessary. These products are designed to break down and lift oil from porous surfaces. When using a degreaser on quartzite, it's important to follow the product's instructions very carefully. Some degreasers can be quite strong, and you don't want to leave them on the stone for too long. Often, you'll apply the degreaser, let it sit for a short period, and then wipe it away. For really tough grease spots, you might need to create a poultice using a degreasing agent mixed with an absorbent material like baking soda. This helps to draw the oil out of the stone. Remember to rinse the area thoroughly afterward and dry it completely to prevent water spots. Always refer to the product's specific guidelines for use on natural stone [bb43].
When dealing with commercial cleaners, always prioritize safety and follow instructions precisely. A little bit of caution goes a long way in protecting your beautiful quartzite surfaces from damage.
Preventative Care for Quartzite Surfaces
Keeping your quartzite looking its best isn't about complicated routines; it's mostly about consistent, simple habits. Because quartzite is a natural stone, the cumulative effect of small actions, like wiping up spills right away and avoiding harsh cleaners, is what really keeps it looking good for years. Think of it like maintaining a car – regular oil changes are more important than one massive overhaul.
The Importance of Regular Sealing
Sealing is probably the most important step in keeping your quartzite from getting stained. Even though quartzite is tough, the sealant is what actually stops liquids from soaking in. It's like putting a protective coat on something valuable. How often you need to seal can change depending on how you use your kitchen or bathroom. Areas that get a lot of water, like around the sink, might need a touch-up more often than a less-used spot. A good way to check if it's time to reseal is the water drop test. Just put a little water on the surface and let it sit for about 10-15 minutes. If the water beads up, you're good. If the stone darkens or looks like a shadow, it's time to reseal.
Choosing the Right Impregnating Sealer
When you're ready to seal, you'll want to pick the right kind of sealer. There are two main types, but only one is really recommended for quartzite. You want an impregnating sealer, which sinks into the stone and fills the tiny pores. This type lets the stone breathe while still blocking stains. Avoid topical sealers; they just sit on the surface like a film and can peel off or change how the stone looks. Always make sure the surface is totally clean and dry before you start applying the sealer. Any moisture left behind can stop the sealer from working properly.
Daily Habits to Maintain Quartzite's Shine
Beyond sealing, a few daily habits make a big difference. The biggest one? Wipe up spills immediately. Seriously, don't let that coffee or wine sit there. Even with a good seal, giving it time to soak in can lead to trouble. For everyday cleaning, stick to pH-neutral cleaners or a little bit of mild dish soap diluted in warm water. Always use a soft cloth, like microfiber, to avoid scratching. And when you're done cleaning, dry the surface thoroughly. This prevents water spots and keeps that natural shine looking fresh. It's all about being gentle and consistent.
Even with its impressive hardness, quartzite has tiny pores that can absorb liquids if not properly sealed. This is why consistent sealing and prompt cleanup of spills are so vital for preventing stains and maintaining the stone's natural beauty over time.
Wrapping Up: Keeping Your Quartzite Looking Great
So, dealing with stains on your quartzite might seem like a big deal at first, especially since these countertops can be pretty pricey. But as we've seen, with the right approach, those unsightly marks don't have to be permanent. Whether you're using a simple baking soda paste or a specialized cleaner, tackling stains promptly and correctly means your beautiful quartzite can keep looking its best for ages. Just remember to act fast when spills happen and keep up with regular sealing, and you'll be enjoying those gorgeous surfaces for a long, long time.
Frequently Asked Questions
Why does my quartzite countertop get stained so easily?
Quartzite is a natural stone that has tiny little holes, like a sponge. These holes, called pores, can soak up liquids like juice or oil. If these liquids sit there for too long, they can cause stains. Sealing the quartzite helps block these holes and makes it harder for stains to form.
What's the best way to clean up a spill on quartzite?
The best thing to do is grab a soft cloth or paper towel and gently press down on the spill. This is called blotting. Try not to wipe it, because that can spread the mess and push it deeper into the stone. After blotting, dry the spot with a clean cloth.
How can I get tough stains out of my quartzite?
For really stubborn stains, you can make a paste called a poultice. A common one is made with baking soda and water. You spread this paste over the stain, cover it with plastic wrap, and let it dry for a day or two. As it dries, it pulls the stain out of the stone.
What should I do about oily stains on my quartzite?
Oil stains can look like dark, wet spots. To remove them, you can make a poultice using baking soda mixed with acetone (like nail polish remover). This mixture helps to draw the oil out of the stone. Let it sit for about a day or two before removing it.
How often do I need to seal my quartzite countertops?
It's a good idea to seal your quartzite about once or twice a year. You can tell if it needs sealing if water starts to soak into the stone instead of beading up on top. Sealing creates a protective shield against stains.
Are there any cleaners I should absolutely avoid using on quartzite?
Yes, definitely! You should never use harsh cleaners like vinegar, lemon juice, bleach, or ammonia. These are acidic and can damage the sealant that protects your quartzite, making it more likely to stain. Also, avoid rough scrubbing pads that can scratch the surface.


