

Mastering the Art: Your Ultimate Guide on How to Oil a Kitchen Worktop
GMS Kumar
Thinking about giving your kitchen worktop a bit of a refresh? Maybe it's looking a little dull, or perhaps you're just aiming for that showroom shine. Well, you've landed in the right spot. Learning how to oil a kitchen worktop isn't as complicated as it sounds, and it can really make a difference. We'll walk you through the whole process, from getting the surface ready to keeping it looking great.
Key Takeaways
- Before you start oiling, make sure your workspace is clear and well-lit. Give the worktop a good clean and let it dry completely.
- Pick the right oil for your specific worktop material. Apply it evenly in small sections, working it into the surface.
- After oiling, buff off any extra oil to avoid streaks. Let the oil fully cure for a durable finish.
- Regular cleaning with mild soap and water is best for daily care. Address spills right away to prevent stains.
- Reapply oil periodically, depending on usage, to keep your worktop protected and looking its best.
Preparing Your Kitchen Worktop For Oiling
Alright, let's get this kitchen worktop ready for its oil treatment. This part is super important, honestly. If you skip steps here, you'll just end up with a patchy, less-than-perfect finish, and nobody wants that. So, let's do this right.
Clearing and Lighting Your Workspace
First things first, you need to clear everything off your worktop. We're talking about appliances, canisters, that weird little decorative spoon collection – everything. You need a completely blank canvas to work with. Also, make sure you've got good lighting. Good light helps you see every little spot and imperfection that needs attention before you start oiling. It might seem obvious, but trust me, I've tried to oil things in dim light before, and it's a recipe for disaster. You'll miss spots, and then you'll have to go back and fix it, which is way more annoying.
Thoroughly Cleaning The Surface
Once it's clear, it's time for a deep clean. Whatever your worktop is made of – wood, slate, or something else – it needs to be spotless. Use a cleaner that's appropriate for your material. For wood, a mild soap and water usually does the trick, but make sure you don't leave it soaking wet. For stone, a pH-balanced cleaner is best. You want to get rid of any grease, grime, or old polish residue. Think of it like prepping a wall for paint; you wouldn't paint over dirt, right? The same idea applies here. If you're dealing with something like butcher block, you might want to give it a light sanding first to open up the pores for the oil. This is a good time to really get into those nooks and crannies. For a detailed look at preparing butcher block, check out this guide on sealing butcher block countertops.
Allowing The Worktop To Dry Completely
This is another step that people sometimes rush, but you really can't afford to. Water is the enemy of oiling. If there's any moisture left on the surface, the oil won't penetrate properly, and you'll get blotchy results. Depending on how much water you used and how humid your kitchen is, this could take anywhere from 15 minutes to a couple of hours. You can speed things up a bit with a clean, dry cloth or even a fan, but make sure it's bone dry before you even think about opening that oil bottle. Seriously, give it ample time. It's better to wait a bit longer than to have to redo the whole thing.
Patience during the preparation phase pays off big time. Rushing through cleaning or drying will only lead to more work down the line. Think of this as the foundation for a beautiful, long-lasting finish.
Applying Oil To Your Kitchen Worktop
Alright, so you've prepped your worktop, and it's looking clean and dry. Now comes the fun part: actually getting some oil onto that surface. This is where you start to see the wood come alive, really. It's not complicated, but you do need to pay attention to a few things.
Choosing The Right Oil For Your Worktop
First off, what kind of oil are you even using? This is pretty important. For most wooden kitchen worktops, a food-safe mineral oil or a specialized worktop oil is the way to go. You can find these at most hardware stores or online. Some people like to use tung oil or linseed oil, but make sure they're pure and suitable for food contact if you plan on prepping food directly on the surface. Always give the oil a good stir before you start; sometimes, the stuff separates in the can.
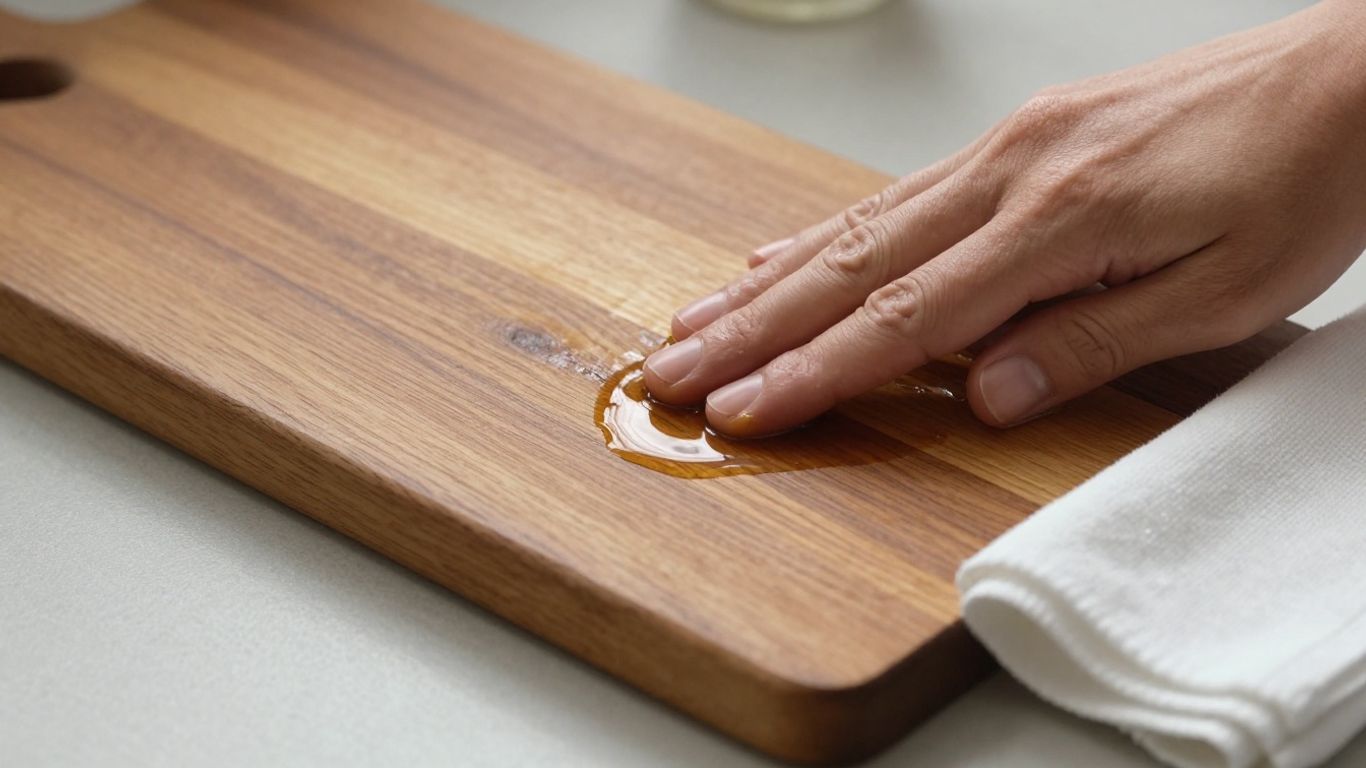
Applying The Oil In Sections
Don't just dump a bunch of oil all over the place. That's a recipe for a mess. Instead, work in small areas, maybe about 2 by 2 feet at a time. Grab a clean, lint-free cloth – a microfiber one works great – and pour a little oil onto it. Then, start rubbing it into the wood. You want to apply it evenly, going with the grain of the wood. Think of it like giving your worktop a good massage.
Working The Oil Into The Surface
As you apply the oil, you'll notice the wood starts to darken and the grain pops. That's exactly what you want. Keep rubbing that oil in. You're not just putting it on top; you're trying to get it to soak into the wood. Spend a good minute or two on each section, really working it in. If you're restoring an old worktop, you might need to do this step a couple of times to get it really saturated. This process is key to restoring and refinishing wooden worktops.
You're essentially feeding the wood, filling up its pores so it can resist moisture and stains better. It's a bit like moisturizing your skin, but for your kitchen.
It's a good idea to have a few cloths handy. One for applying, and then another clean, dry one to wipe off any excess later. You'll see the wood soak up the oil pretty quickly. If it looks like it's drying out too fast in one spot, just add a little more oil there. The goal is a nice, even coat everywhere. Remember to stir the oil well before application to ensure it's properly mixed.
Achieving A Flawless Finish

So, you've oiled your worktop, and now it's time to make it look really good. This is where the magic happens, turning a functional surface into something that really catches the eye. It’s not just about slapping on some oil; it’s about the final touches that make all the difference.
Buffing Away Excess Oil
After letting the oil soak in for a bit, you'll likely see some oil sitting on the surface. Don't leave it there! Grab a clean, dry microfiber cloth. Work in small circles, applying a bit of pressure. Keep going until you don't see any wet spots or residue. You might need to switch to a fresh cloth partway through; this is totally normal and helps avoid streaks. This buffing step is key to preventing a sticky finish.
Ensuring A Streak-Free Shine
To get that smooth, even look, pay attention to how you buff. Overlapping your circular motions helps blend everything together. If you notice any dull patches or lines, it usually means there's still too much oil or you haven't buffed enough in that spot. A final wipe-down with a completely dry, clean cloth can help bring out the best shine. It’s all about patience here; rushing this part can lead to a less-than-perfect result.
Allowing The Oil To Cure
Once you're happy with the shine, you need to let the oil do its thing. This is called curing, and it's when the oil hardens and really bonds with the wood. It might feel dry to the touch pretty quickly, but it needs more time to fully set. Avoid putting heavy items or getting the surface wet for at least 24-48 hours, sometimes longer depending on the oil you used. This curing period is super important for the oil to provide lasting protection. For more on applying oil, check out this step-by-step process for oiling solid wood worktops.
This curing time is non-negotiable for a durable finish. Skipping it can mean your hard work doesn't last as long as it should, and you might find yourself redoing the job sooner than expected.
Maintaining Your Oiled Worktop
So, you've gone through the whole process of oiling your kitchen worktop, and it looks fantastic. Now, the big question is, how do you keep it that way? It's not rocket science, honestly. A little bit of regular attention goes a long way in keeping your worktop looking its best and protecting it from daily wear and tear.
Daily Cleaning Practices
For everyday messes, stick to the simple stuff. A damp cloth with a bit of mild dish soap is usually all you need. Wipe it down after you've finished cooking or prepping food. Wipe up spills as soon as they happen, especially things like wine, coffee, or oil, because letting them sit can lead to stains.
- Use a soft cloth or sponge.
- Mild dish soap and water are your best friends.
- Dry the surface thoroughly after cleaning to prevent water spots.
Avoid harsh chemicals or abrasive cleaners. They can strip away the oil and damage the finish. If you're unsure about a cleaner, it's always best to test it on an inconspicuous spot first.
Remember, the goal is to protect the oil finish, not to scrub it away. Gentle is the name of the game here.
Addressing Spills And Stains Promptly
When something spills, don't just leave it there. Quick action is key. For most common spills, a damp cloth will do the trick. If you have a tougher stain, you might need a slightly stronger approach. For wooden surfaces, a mixture of equal parts white vinegar and water can sometimes help, but always test it first. After dealing with a stain, make sure to re-oil the spot if it looks like the finish has been affected. This helps maintain the worktop's protective layer.
Reapplying Oil For Longevity
How often you need to re-oil depends on how much you use your worktop and what kind of oil you used initially. A good rule of thumb is to give it a light re-oil every few months. You'll notice it's time when water stops beading up on the surface and starts to soak in. This is a sign that the protective layer is wearing thin. You can find specific oils for your worktop that will help maintain its smooth, sealed finish. Just follow the same application steps you did the first time – apply, let it soak in, and buff off the excess. It’s a simple process that makes a big difference in keeping your worktop looking great for years to come.
Understanding Different Worktop Materials
Caring For Slate Worktops
Slate is a pretty cool material for countertops. It looks good, it's tough, and honestly, it doesn't need a ton of fuss. When you get a good quality slate piece, it's a good idea to treat it right from the start. Slate itself is pretty much waterproof, but the surface can soak up a little bit. Putting on some special slate oil when you first install it really helps protect it and makes it look even better. Applying it is simple: just wipe it on with a clean cloth in circles, then wipe off the extra with another dry cloth until it feels dry to the touch. For daily cleaning, mild soap and water are all you need. What's neat about slate is that it doesn't really mind acids or strong cleaners, though you don't usually need them. If you do use them, just reapply the slate oil afterward to keep it looking sharp. Don't worry too much about scratches either; light ones often disappear with regular cleaning. For deeper ones, a bit of very fine steel wool can sort it out, and then a quick oiling makes it look like new again.
- Do oil your slate whenever you feel like it to keep it looking its best.
- Do stick to natural products and gentle soaps for cleaning.
- Do use your favorite cleaners without worrying about damage.
- Do buff out bigger scratches with fine steel wool if they pop up.
Protecting Wooden Surfaces
Wooden worktops bring a warm, natural feel to any kitchen. You've got a lot of choices, from lighter woods like ash and beech to warmer ones like maple and oak, and even darker options like walnut. Each type has its own look and vibe. These surfaces are durable, but they do need regular attention to stay in good shape. Oiling is key here to stop mold and mildew and keep the wood hygienic. It’s not a super complicated process, but it does require a bit of commitment to keep that lovely finish looking good. You can find a good range of oils specifically for wood to help you out.
Considering Other Natural Stone Options
Beyond slate and wood, there are other natural stones that make fantastic worktops. Sintered stone, for example, is incredibly tough and can handle high heat, making it great for busy kitchens. Granite is another popular choice; it's beautiful but usually needs sealing about once a year to prevent stains. These materials offer a sophisticated and hard-wearing surface that can really stand up to daily use. They are often non-porous, which means spills like red wine or grease don't tend to soak in and cause trouble. Choosing the right stone means you get a surface that looks great and lasts for ages with the right care.
Keep That Shine Going
So, there you have it. Oiling your kitchen worktop might seem like a small thing, but it really makes a difference in how it looks and how long it lasts. It’s not a super complicated job, and with the right stuff and a little bit of time, you can keep your worktop looking great. Just remember to clean it well first and use a good oil. Doing this regularly will help protect it from spills and wear, keeping your kitchen looking nice for ages. Don't overthink it; just give it a go!
Frequently Asked Questions
How often should I oil my kitchen worktop?
You'll want to oil your worktop whenever it starts to look dry or water doesn't bead up on the surface anymore. For most kitchens, this might be every few months, but it really depends on how much you use your worktop and what kind of oil you used initially. Keeping an eye on it is key!
What kind of oil is best for my kitchen worktop?
The best oil depends on what your worktop is made of. For wood, special wood oils or mineral oil are usually recommended. For stone like slate, a specific stone oil works wonders. Always check what the manufacturer suggests for your specific material to get the best results.
Do I need to do anything special before oiling?
Yes, definitely! First, clear everything off the worktop. Then, give it a really good clean to get rid of any dirt, grease, or old oil. Make sure it's completely dry before you start oiling. This helps the new oil soak in properly and give you a nice, even finish.
How do I avoid streaks when oiling?
Streaks happen when there's too much oil left on the surface. After you apply the oil and let it soak in a bit, use a clean, dry cloth to buff off any extra oil. Work in small sections and keep buffing until the surface looks smooth and even. Changing to a fresh cloth if it gets too oily helps a lot.
How long does it take for the oil to fully dry and be usable?
This can vary, but it's usually best to let the oil 'cure' for at least 12 to 24 hours before you put anything heavy on it or get it wet. Some oils might be ready for light use sooner, but giving it that full curing time ensures the oil hardens properly and protects your worktop best.
What's the difference between oiling wood and stone worktops?
Wood worktops soak up oil like a sponge to protect them from moisture and stains. Stone worktops, especially ones like slate, might be oiled to enhance their color and add a bit of protection, but they are often naturally very tough and don't need as much oiling as wood does. Always use the right kind of oil for each material.


